
Syndicated by One Source Media, Long Island City, New York
Wouldn’t it be great to be able to recreate someone’s handwriting using your embroidery machine? Guess what? It’s actually pretty easy to digitize handwriting for machine embroidery. And it has a lot of practical applications. You can contact the best NYC machine embroidery shop—One Source Media—for your embroidery needs. OSM also offers more digital printing services, such as Westchester custom decals, Queens wall lettering, Manhattan window decals, truck wraps, boat wraps, and more.
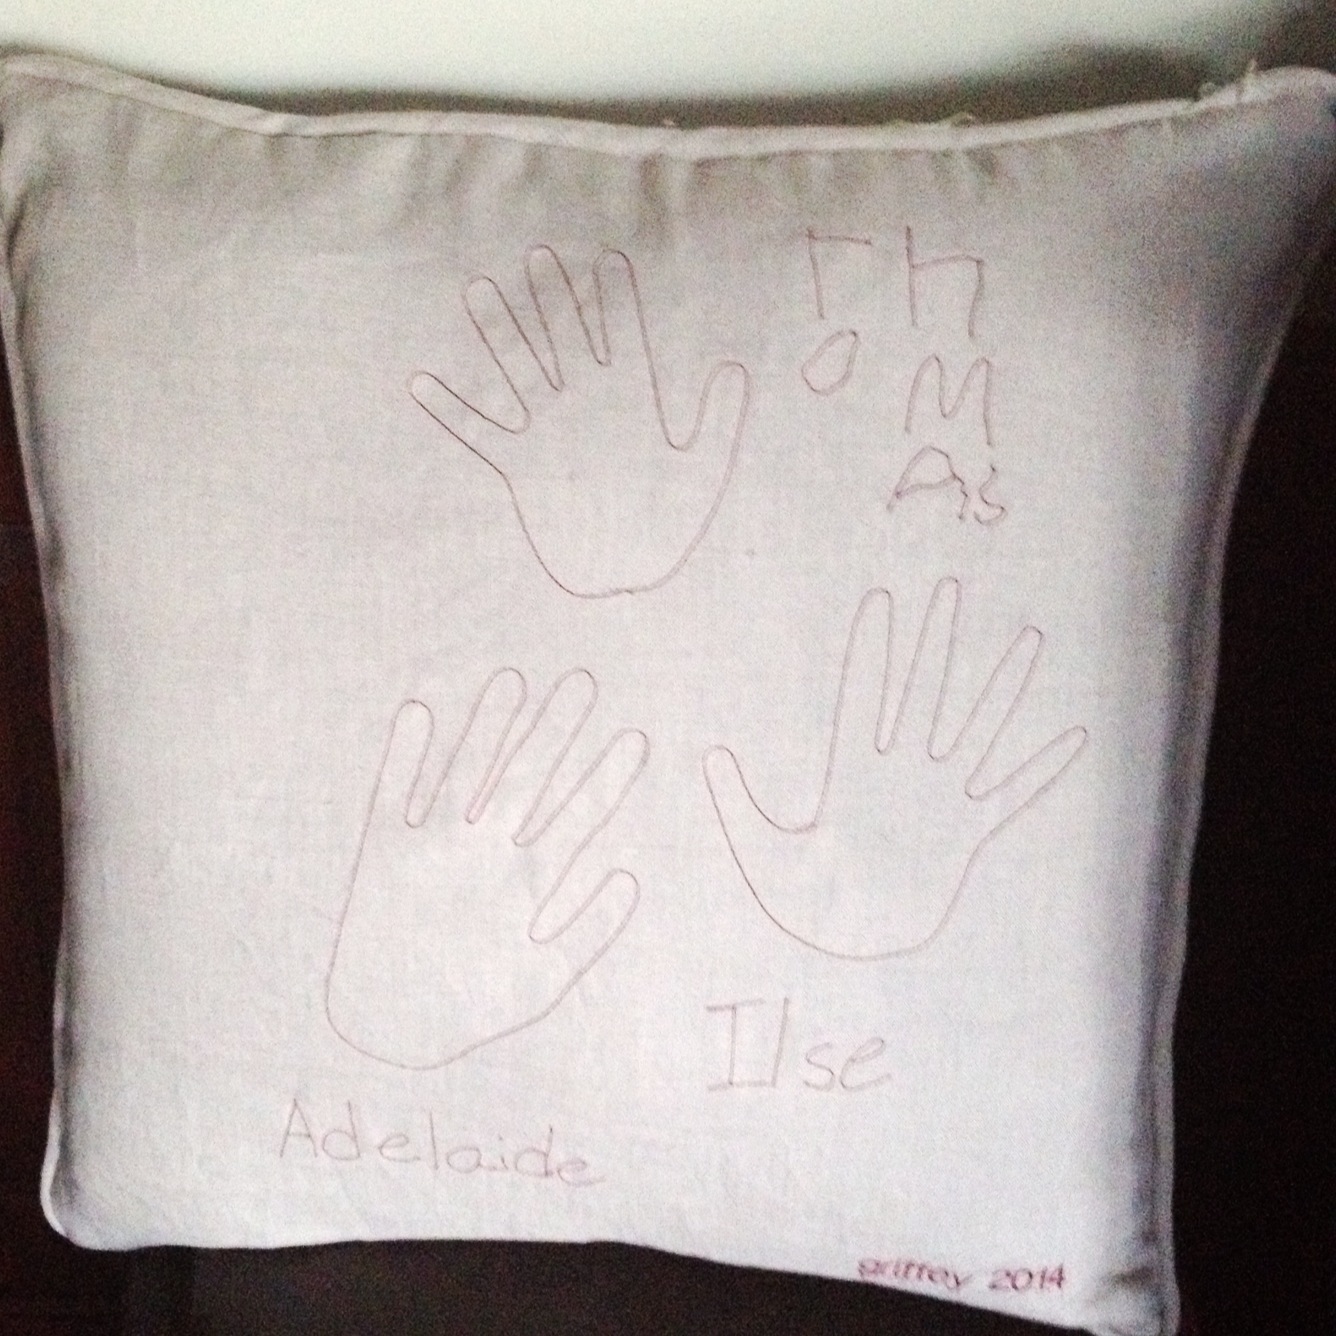
Years ago, I made a pillow for my parents comprised of the outlines and “signatures” of all my kids. It truly captured the moment in their development, both in size and in writing skills.
At the time, I used my Bernina Artista embroidery digitizing software to create the embroidery files. However, I recently learned that digitizing handwriting for machine embroidery is a task that SewArt (a very inexpensive embroidery digitizing program) is well-equipped to handle.
Products mentioned in this post
- SewArt embroidery digitizing software
- Photopea web-based image editing program
Why digitize handwriting?
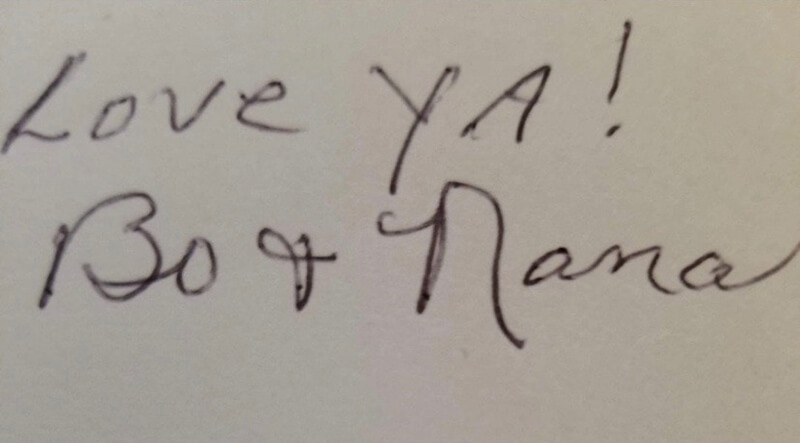
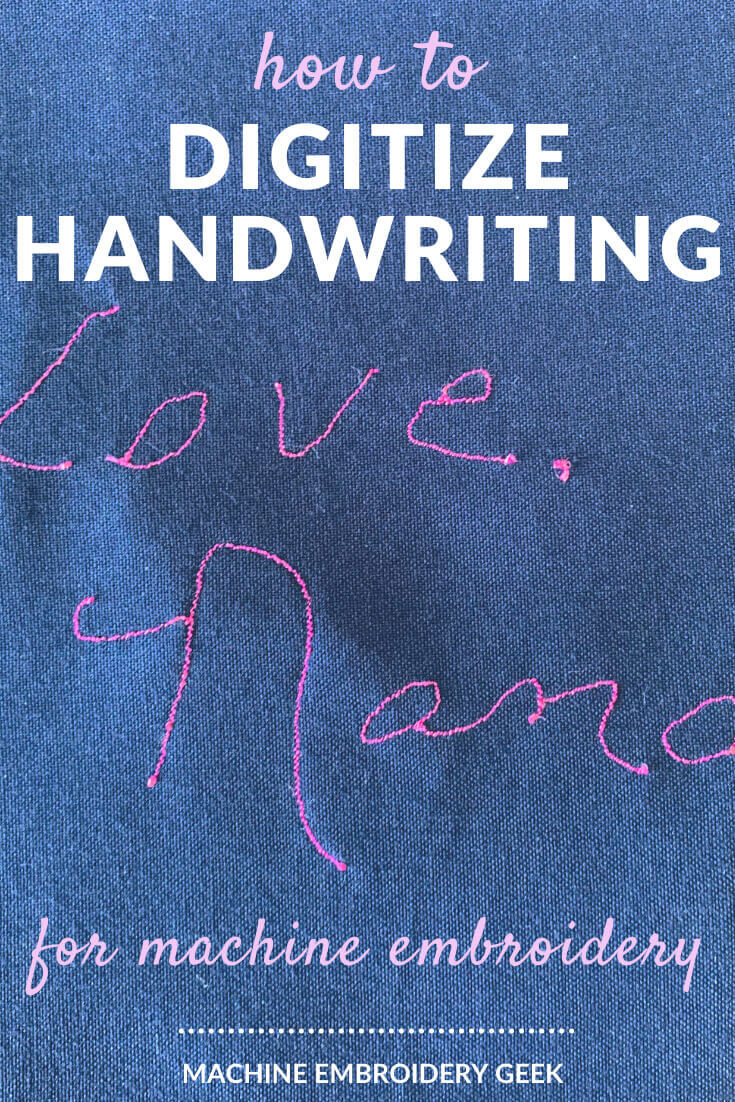
The opportunity to test out SewArt’s handwriting digitizing capabilities arose when my friend, Ellie (of Gracefully Stitched STL), received a customer request. The customer wanted to add “Love, Nana” on a fuzzy blanked, but stitched in Nana’s writing. So, Ellie contacted me to see if it could actually be done.
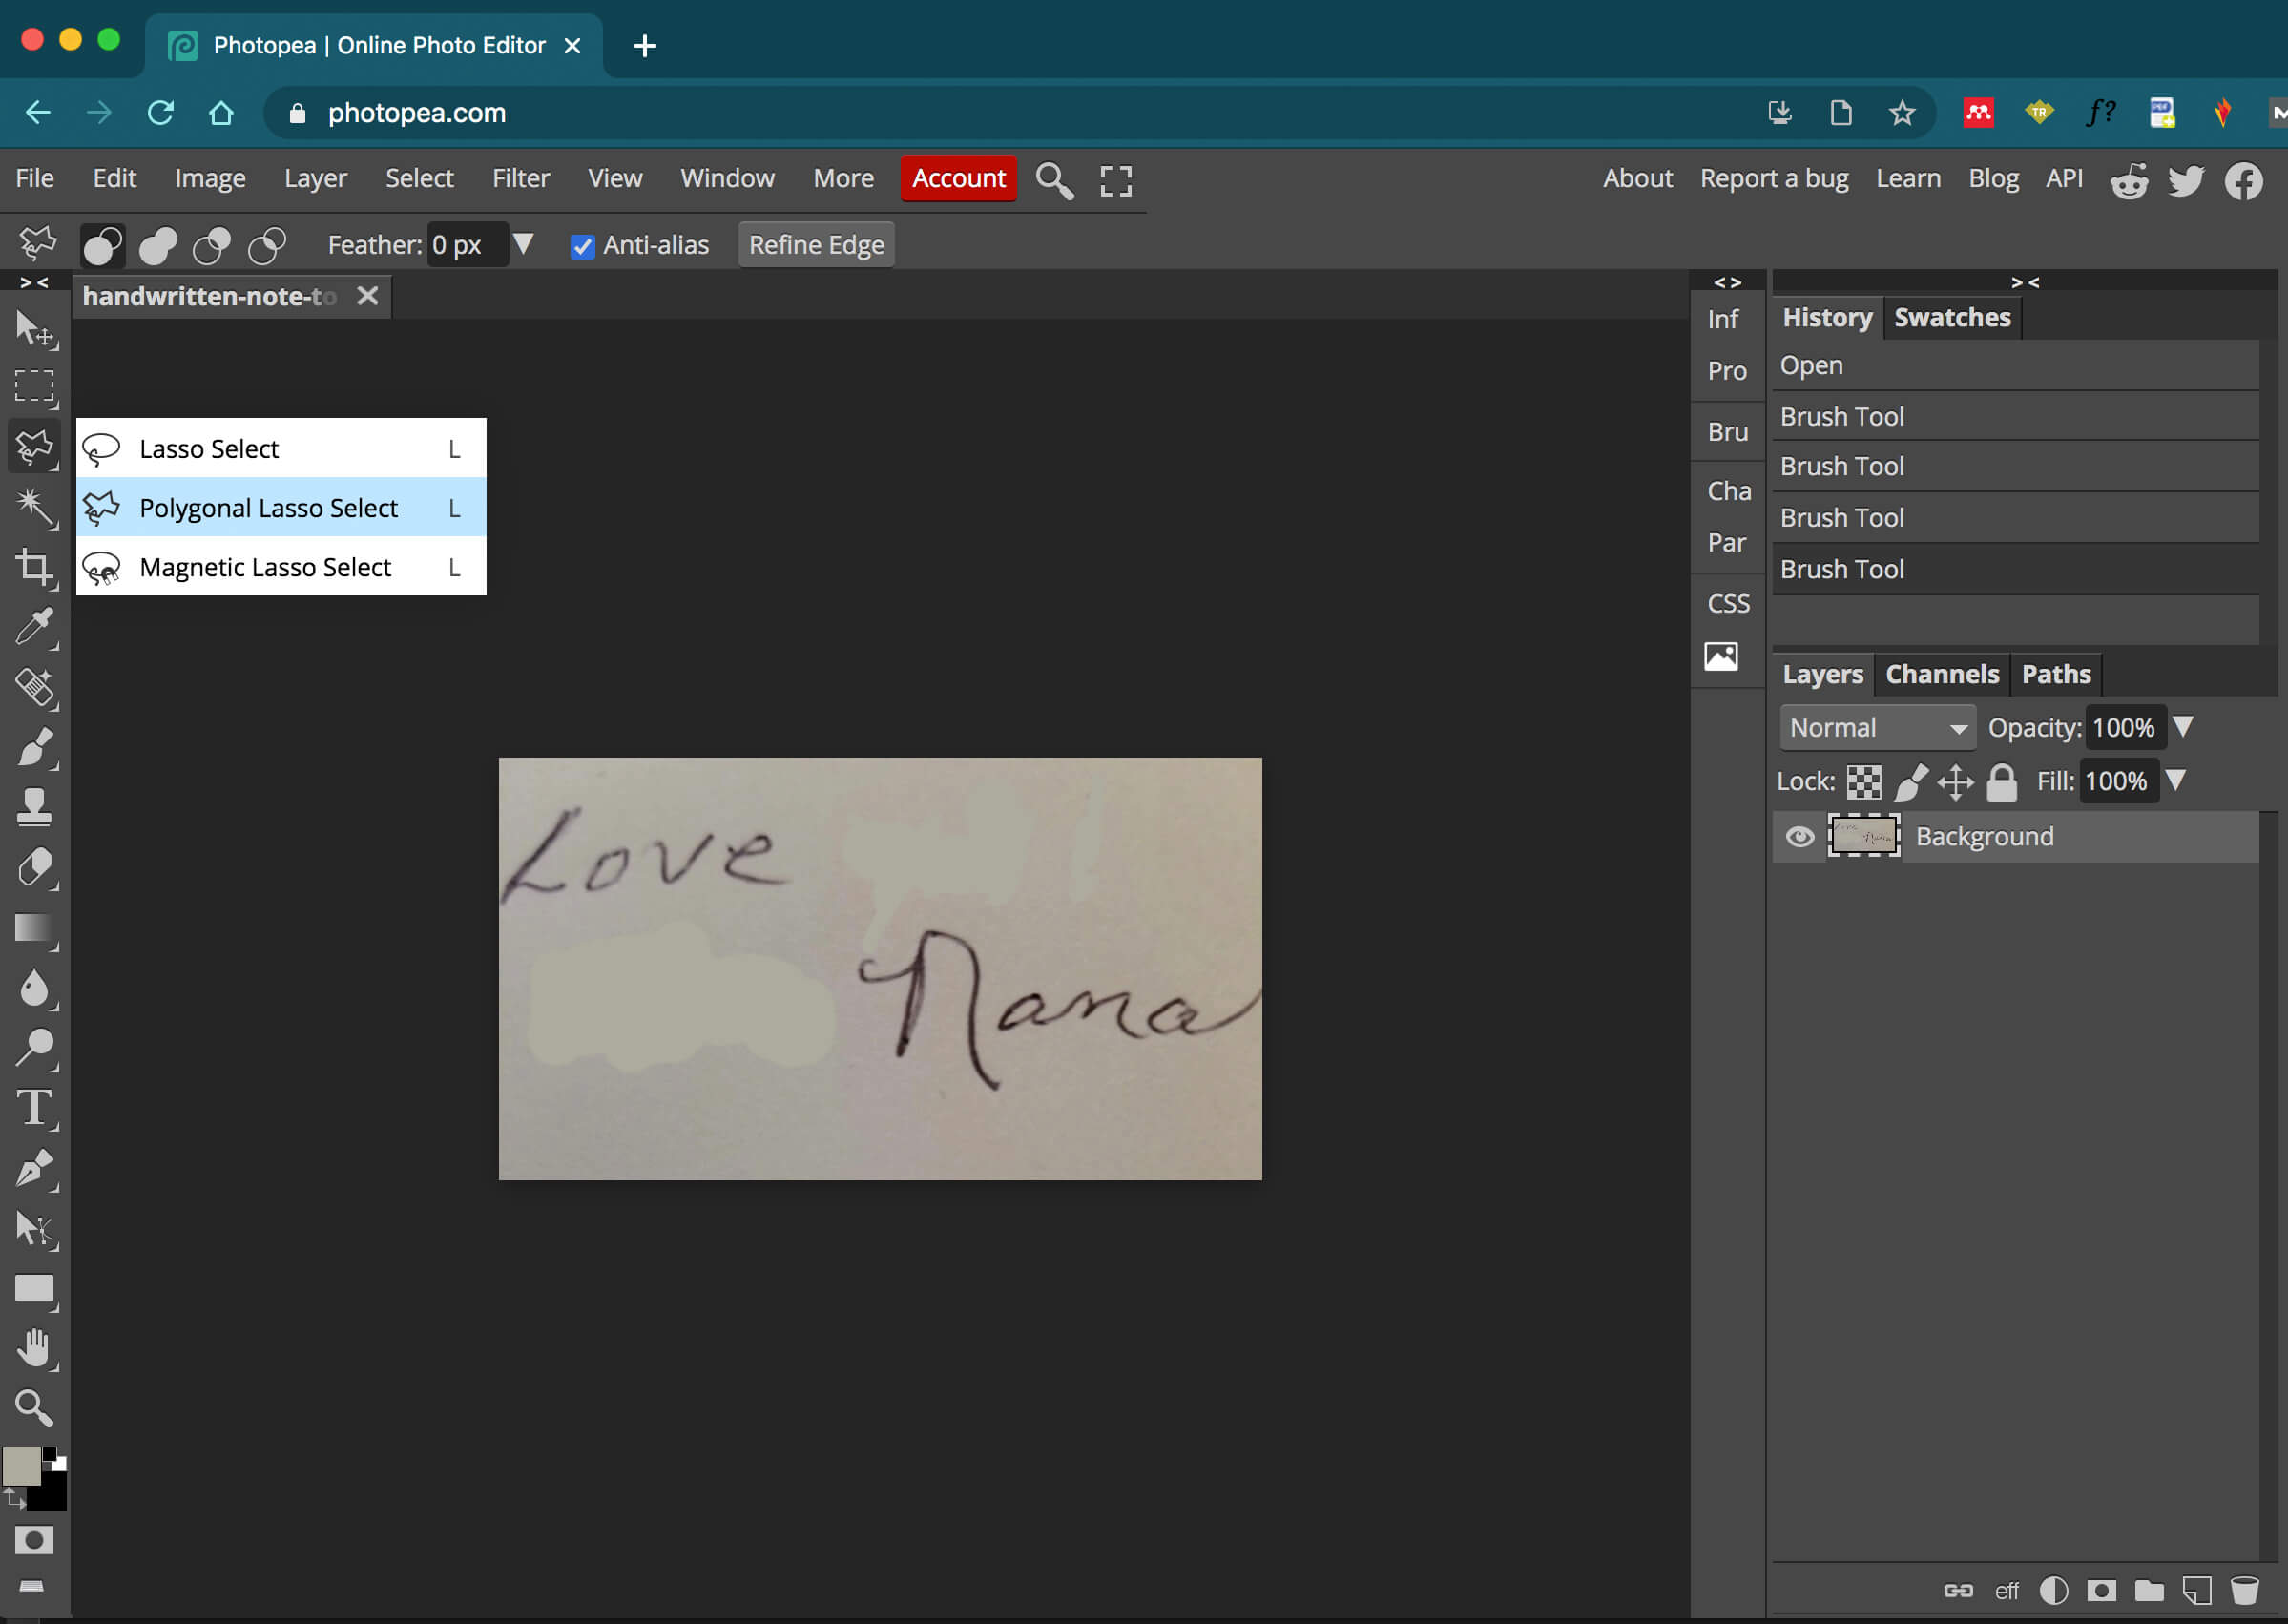
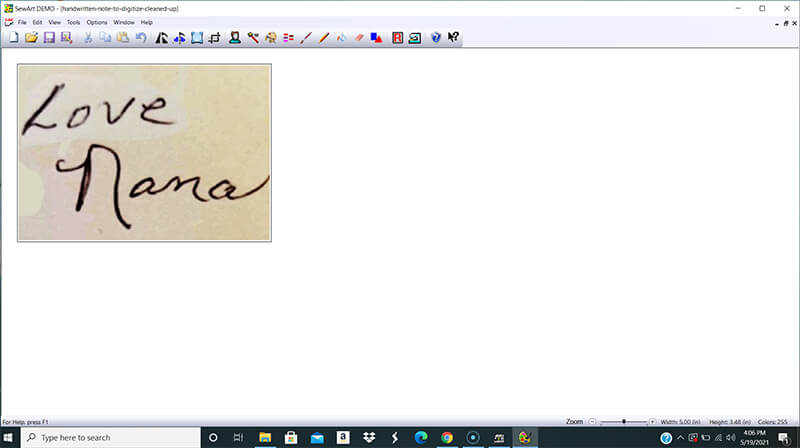
The handwriting sample that the customer provided looked like this (below). But, the customer just wanted the “Love Nana” part to be converted into embroidery.
I knew I could create a good replication of the handwriting in my more expensive digitizing program. But, could I digitize this handwriting sample in SewArt?
SPOILER ALERT! I was pleasantly surprised with the results. Read on to see exactly how I did it.
How to digitize handwriting for machine embroidery
Why clean up the image before digitizing?
In order for SewArt to create stitches based on an image, you should really make some modifications to your image before you bring it into the program. If you look at the handwriting image the customer gave Ellie, you can see that there were some extra words I needed to get rid of. In addition to this editing, I also wanted to improve the contrast of the image so that it would be easier for SewArt to determine what was writing and what was background.
Why clean up the image before digitizing?
An AMAZING and free web-based software you can use to edit images is called Photopea. It is nearly identical to the professional level image editing program, Photoshop. However, it is completely free and runs within your web browser. You can get to it here: www.photopea.com.
(Of course you can do the following steps in Photoshop as well – but I wanted to show a free options for people who don’t own Photoshop.)
Removing the unwanted words
First, you will need to open your image in Photopea (File -> Open) and then browse to the image.
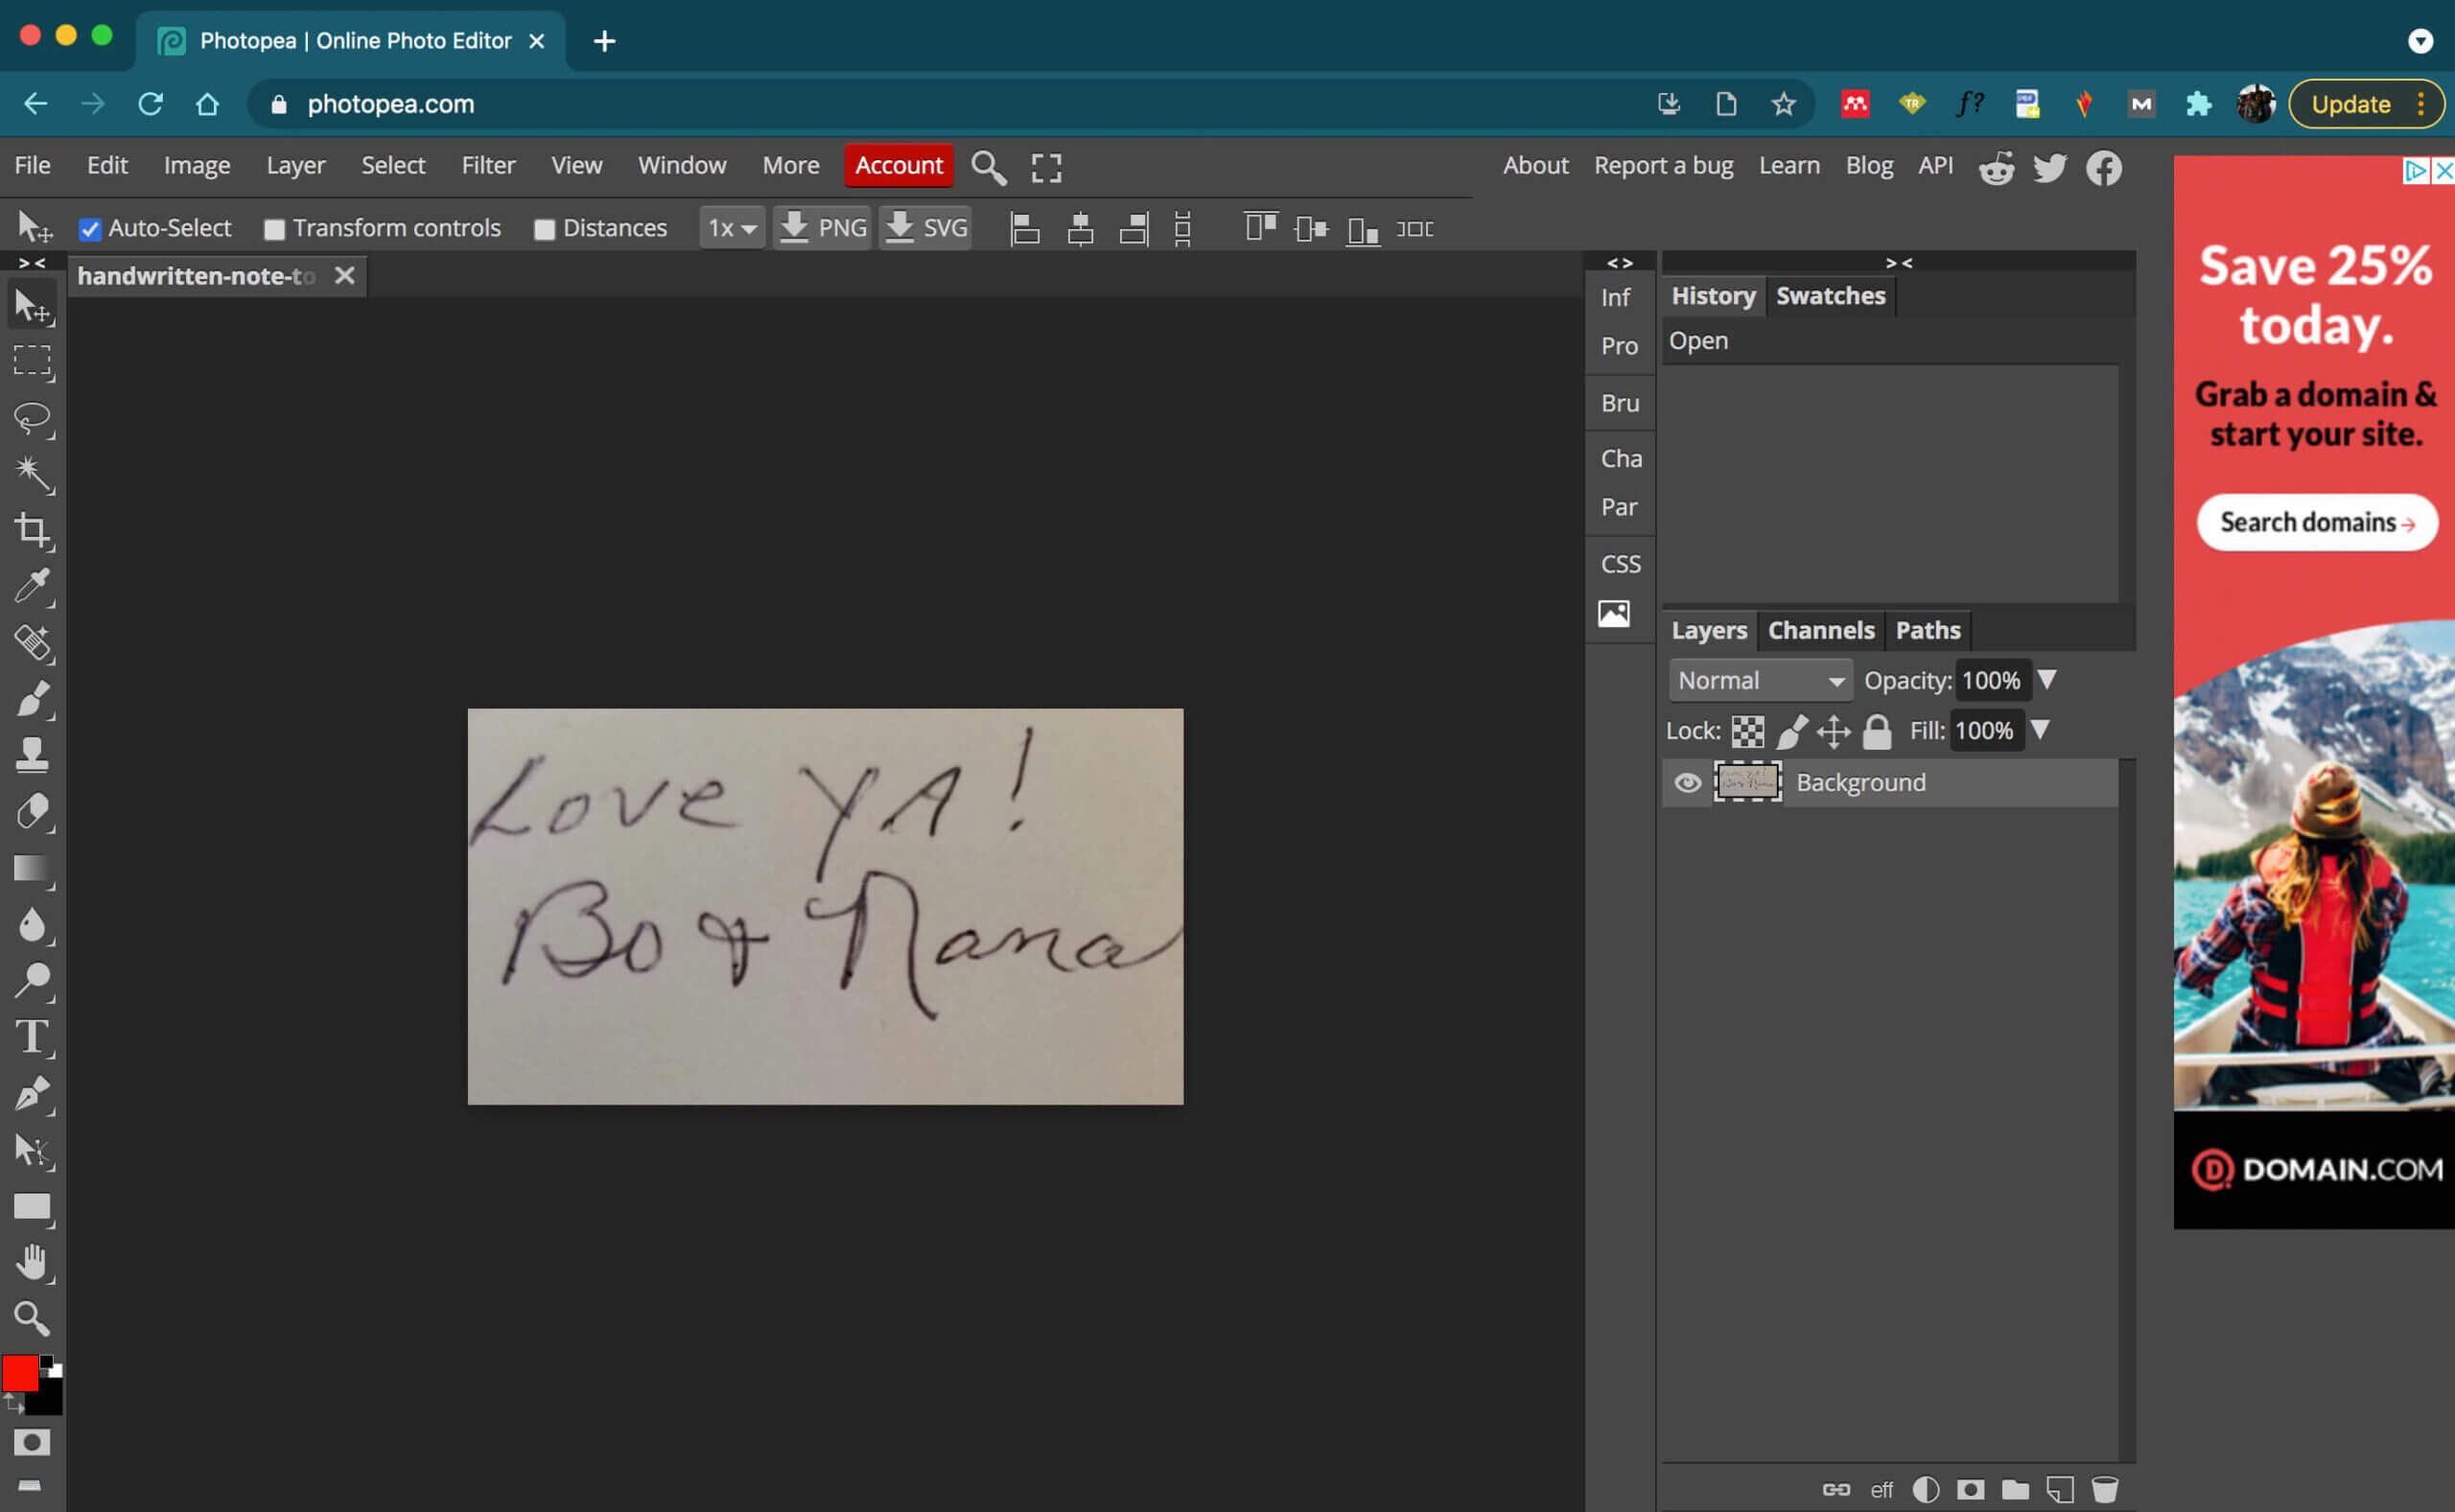
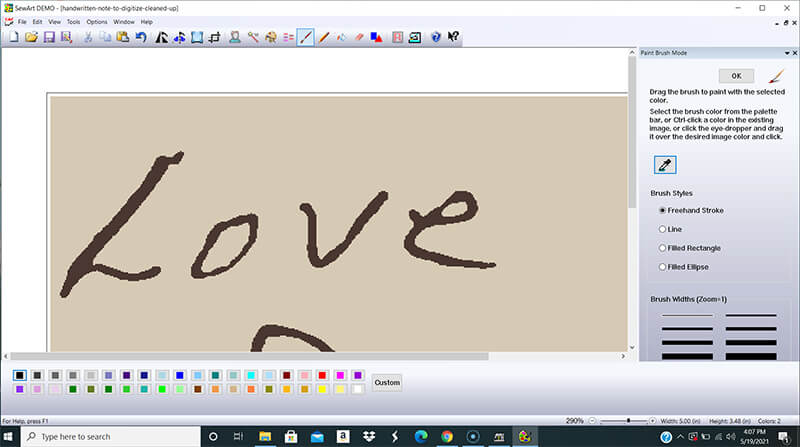
The first step I took was to remove the parts of the text I didn’t want to digitize. I did this by sampling the background using the eyedropper tool and then “painting the background” over the text I wanted to remove.
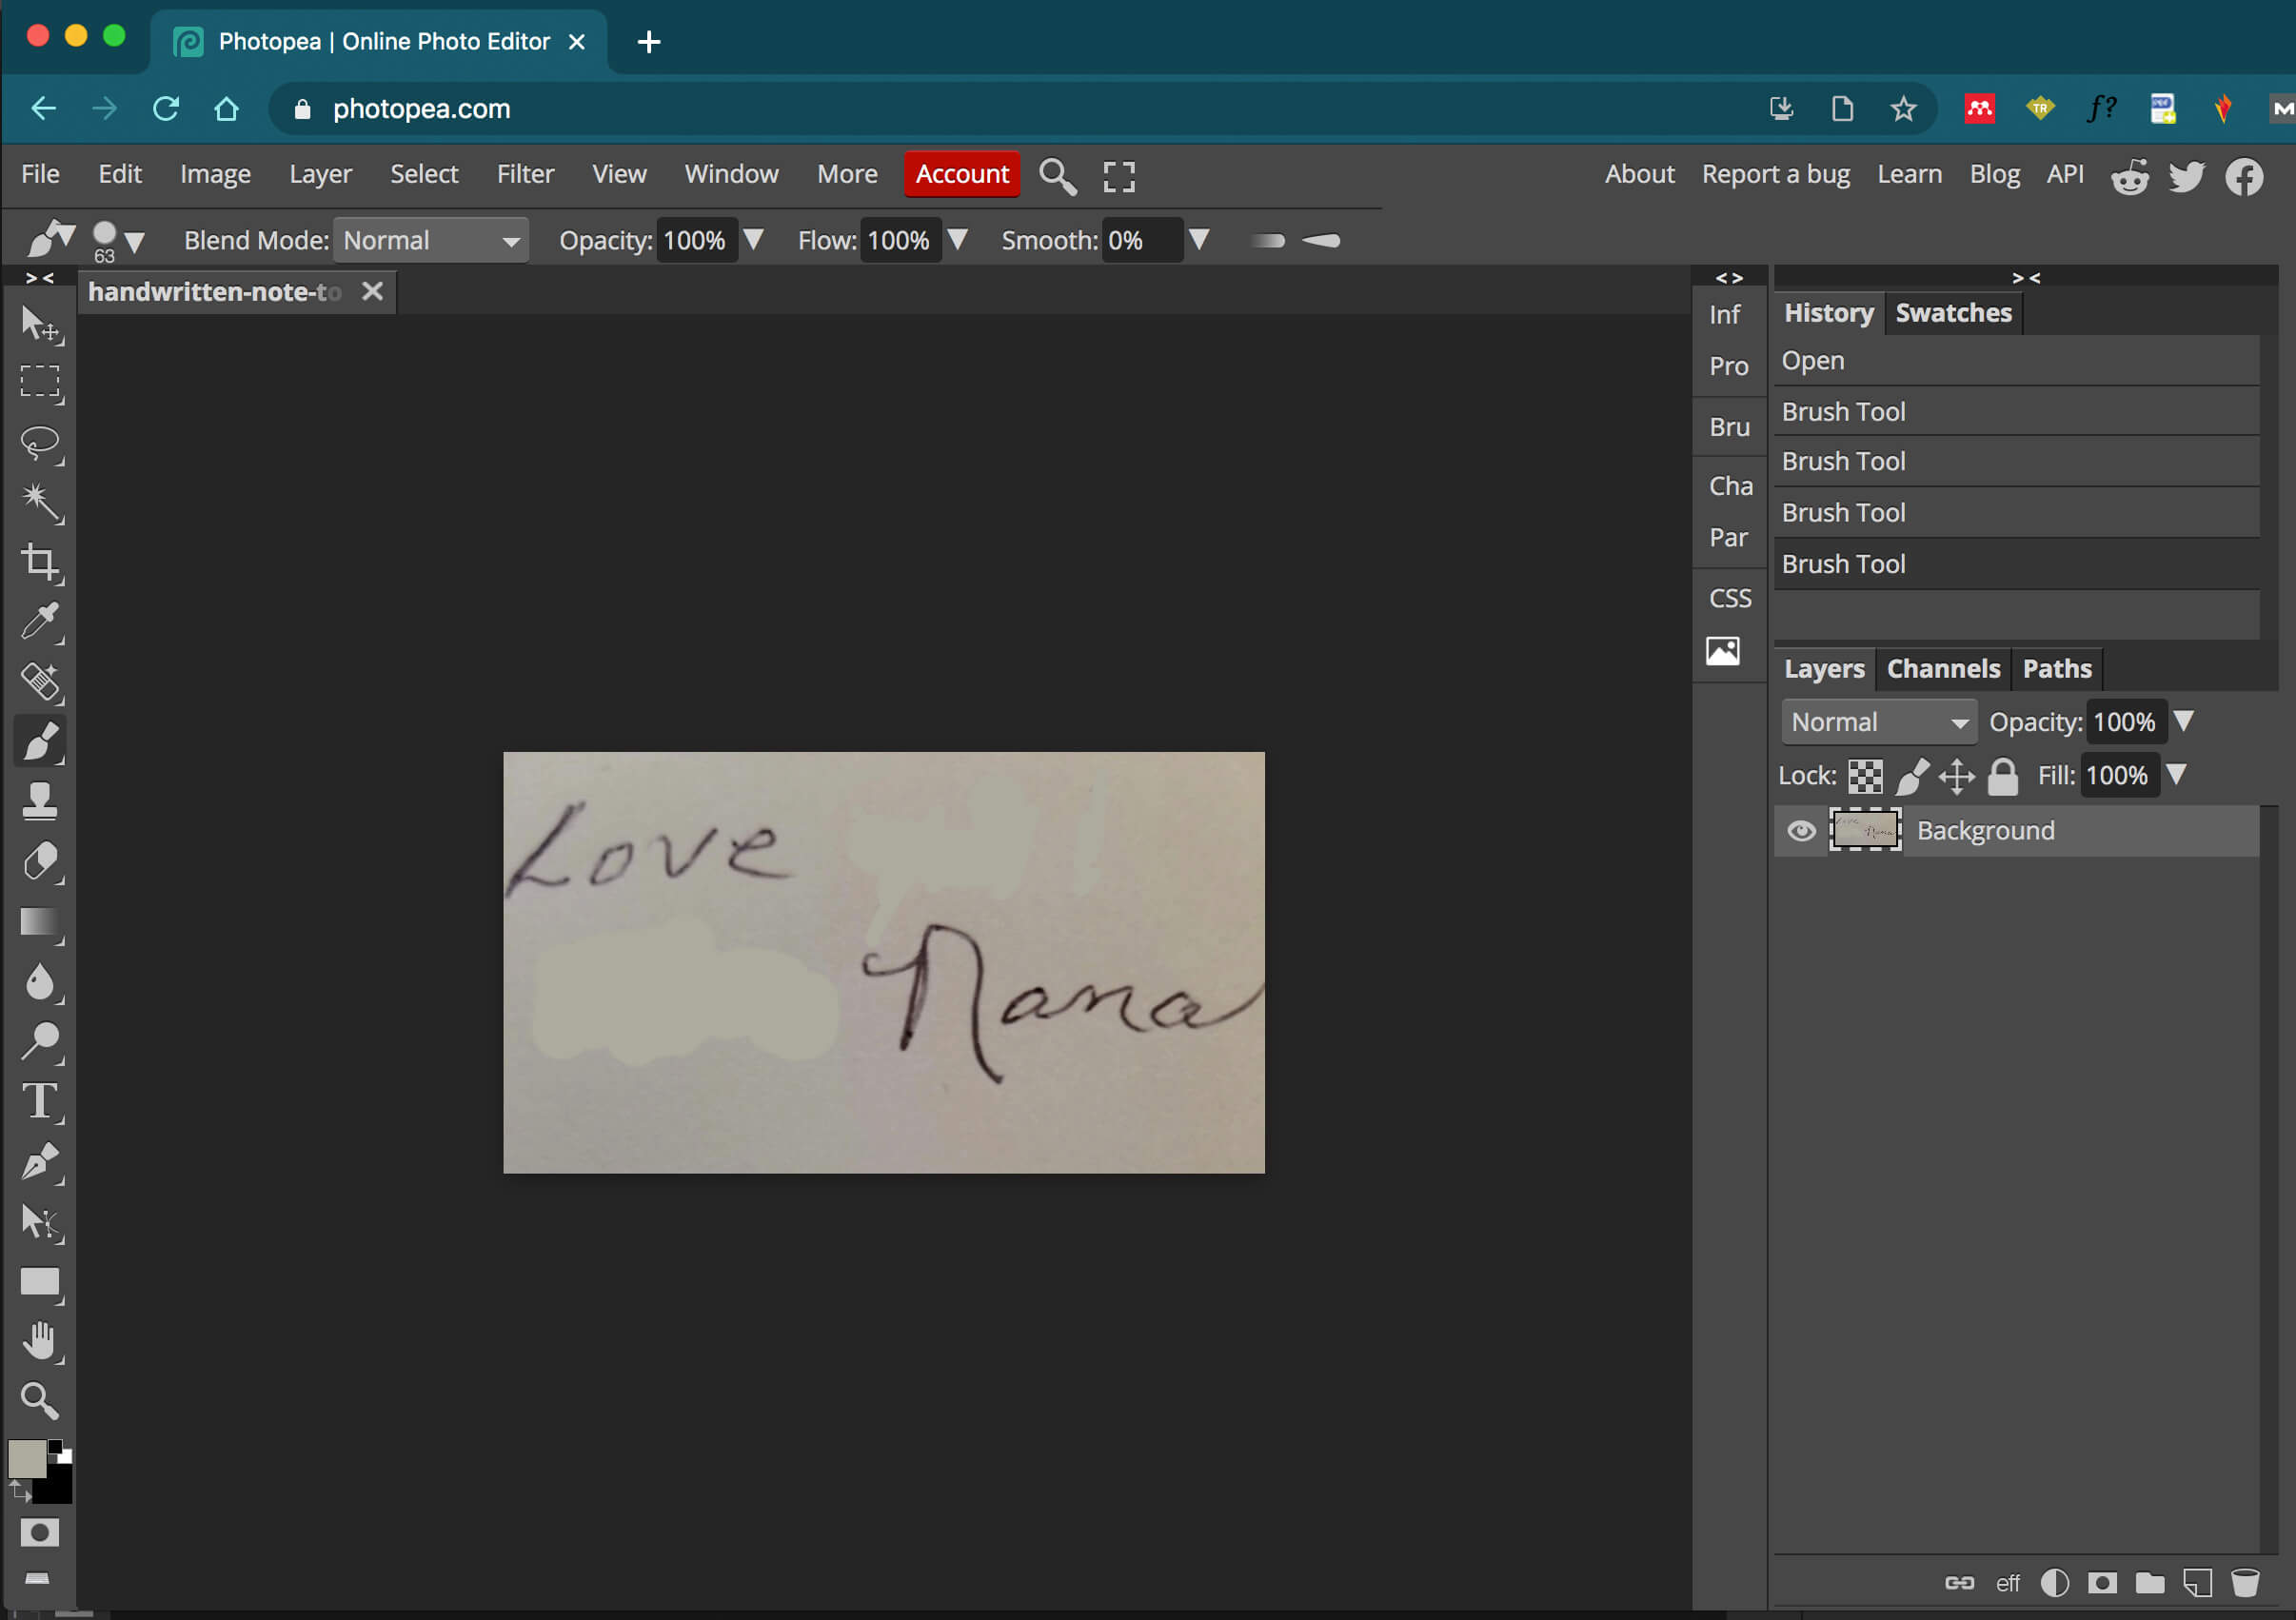
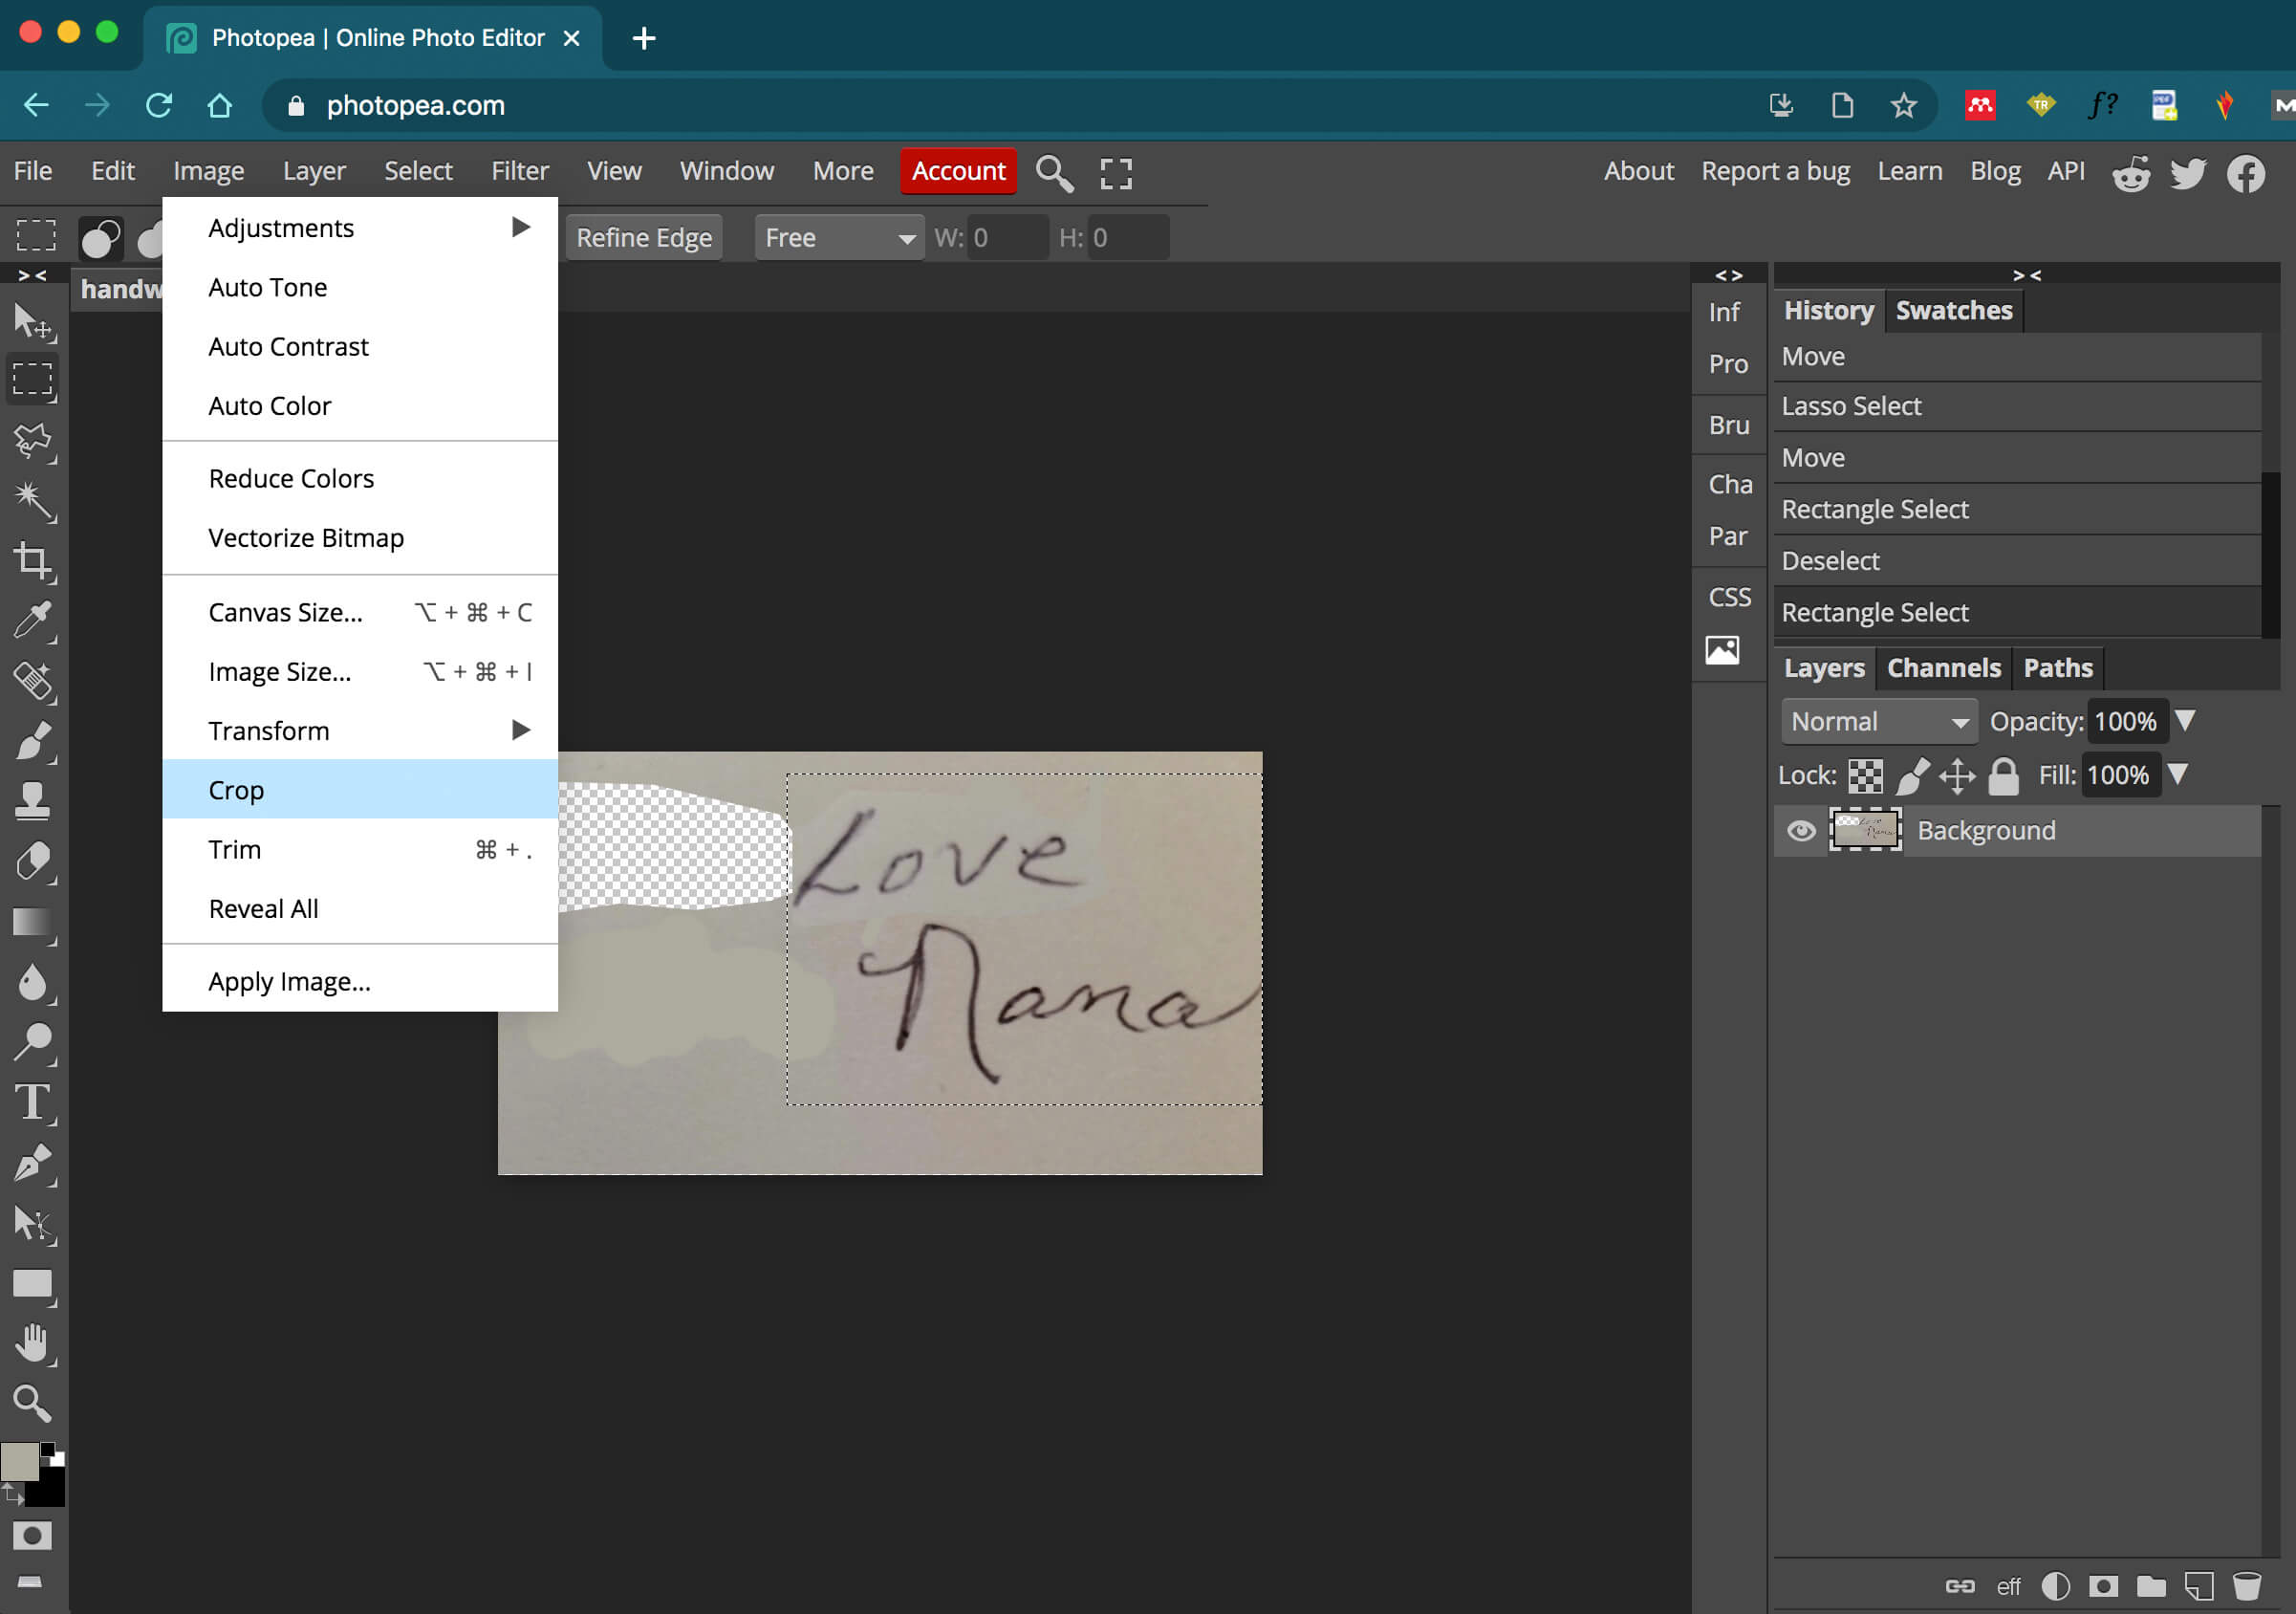
Next, I moved the remaining words closer together. I used the Polygonal Lasso tool and clicked around the word “Love” to select it.
Then I chose Edit -> Cut, then Edit -> Paste. This put the cut out area on a new layer so I could freely move it wherever I wanted in the image. I used the move tool to move it to an appropriate location.
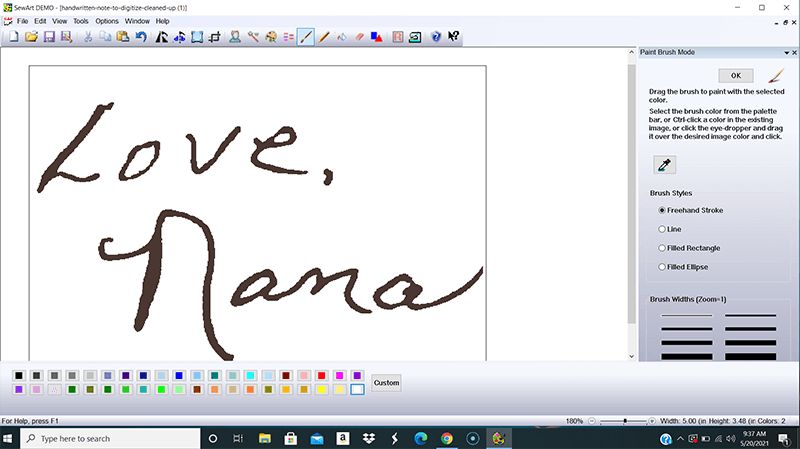
As you can see, this left a hole in the image which I chose to ignore for just a minute.
To get rid of the excess background, I used the rectangular marquee tool to create a rectangular selection around the remaining words and selected Image -> Crop.
I colored in any remaining “hole” with the background color. This was the same technique I used to paint over unwanted words.
I also flattened the image (Layer -> Flatten Image) so that any color adjustments I would make would apply to the entire image.
Enhancing the color contrast
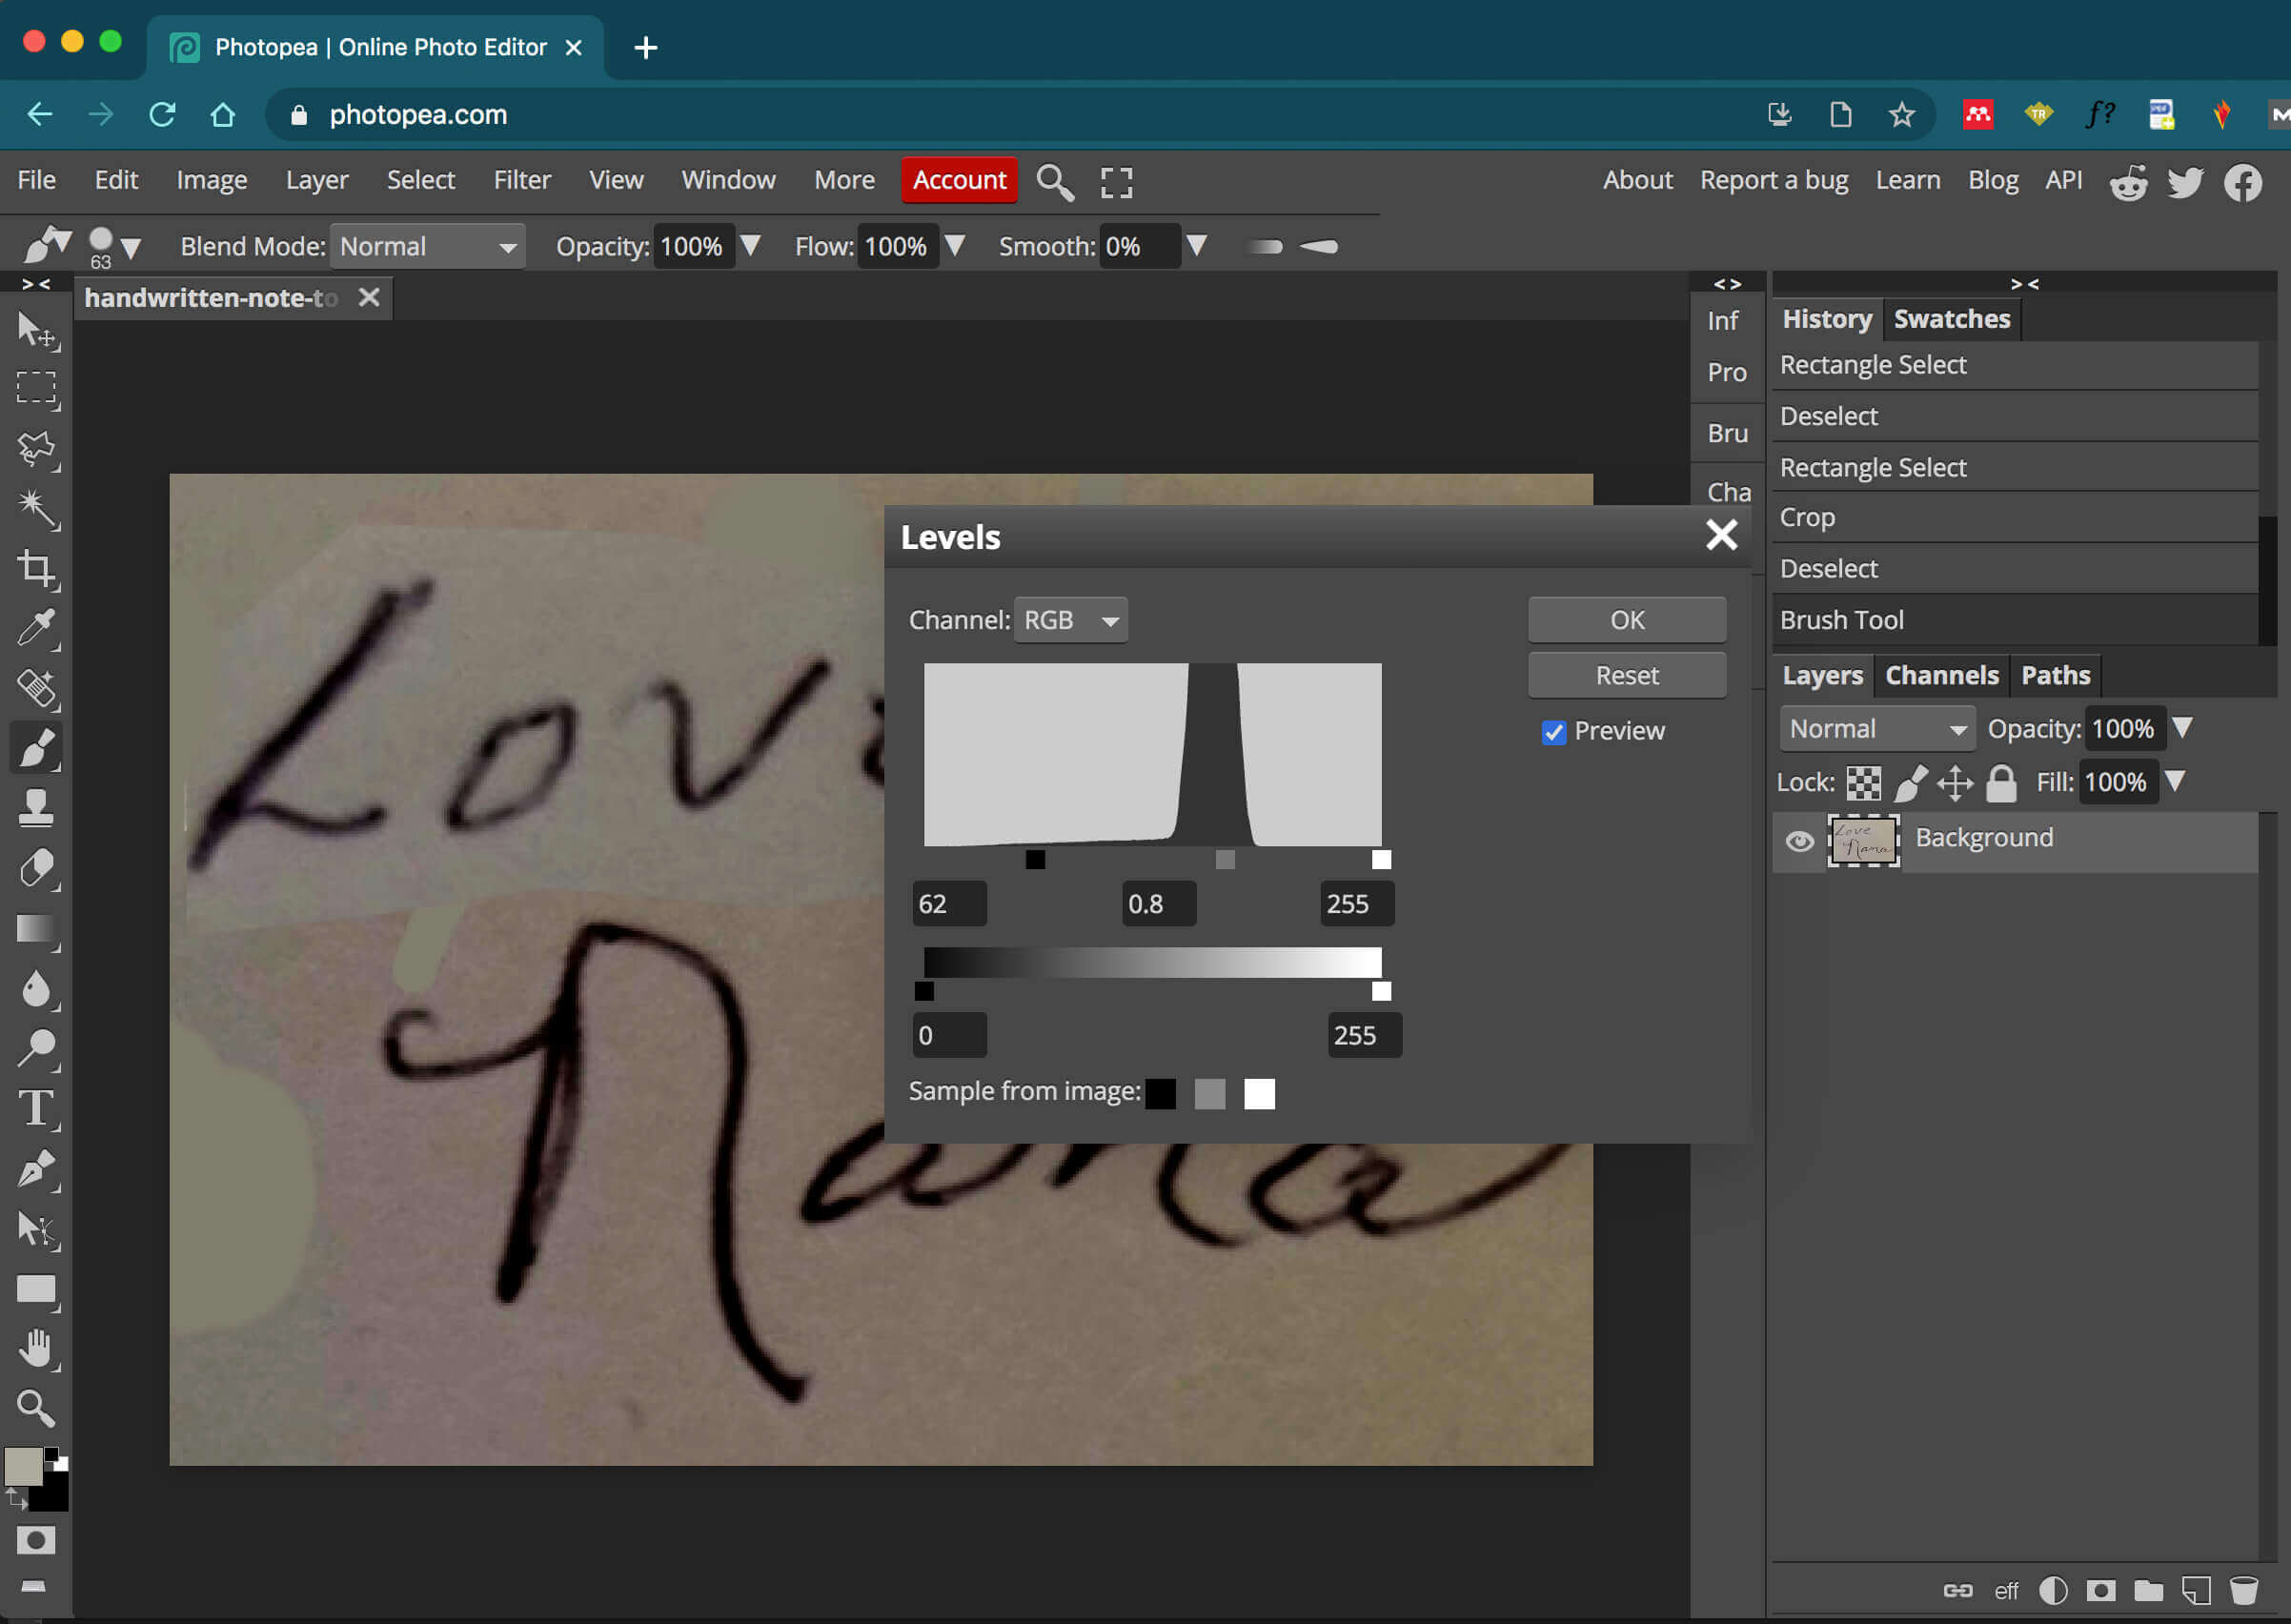
I used a couple of different tools to improve the contrast between the handwriting and the background.
First, I made a levels adjustment. The Levels histogram is diagram of the pixel lightness/darkness and everything in between. To achieve more contrast in your image, you need to bring the black and white sliders together. You may also move the grey slider closer to the black or white – depending on the effect you are trying to create.
After I finished adjusting the levels, I also used Image -> Brightness/Contrast to increase the contrast even more between the writing and the background.
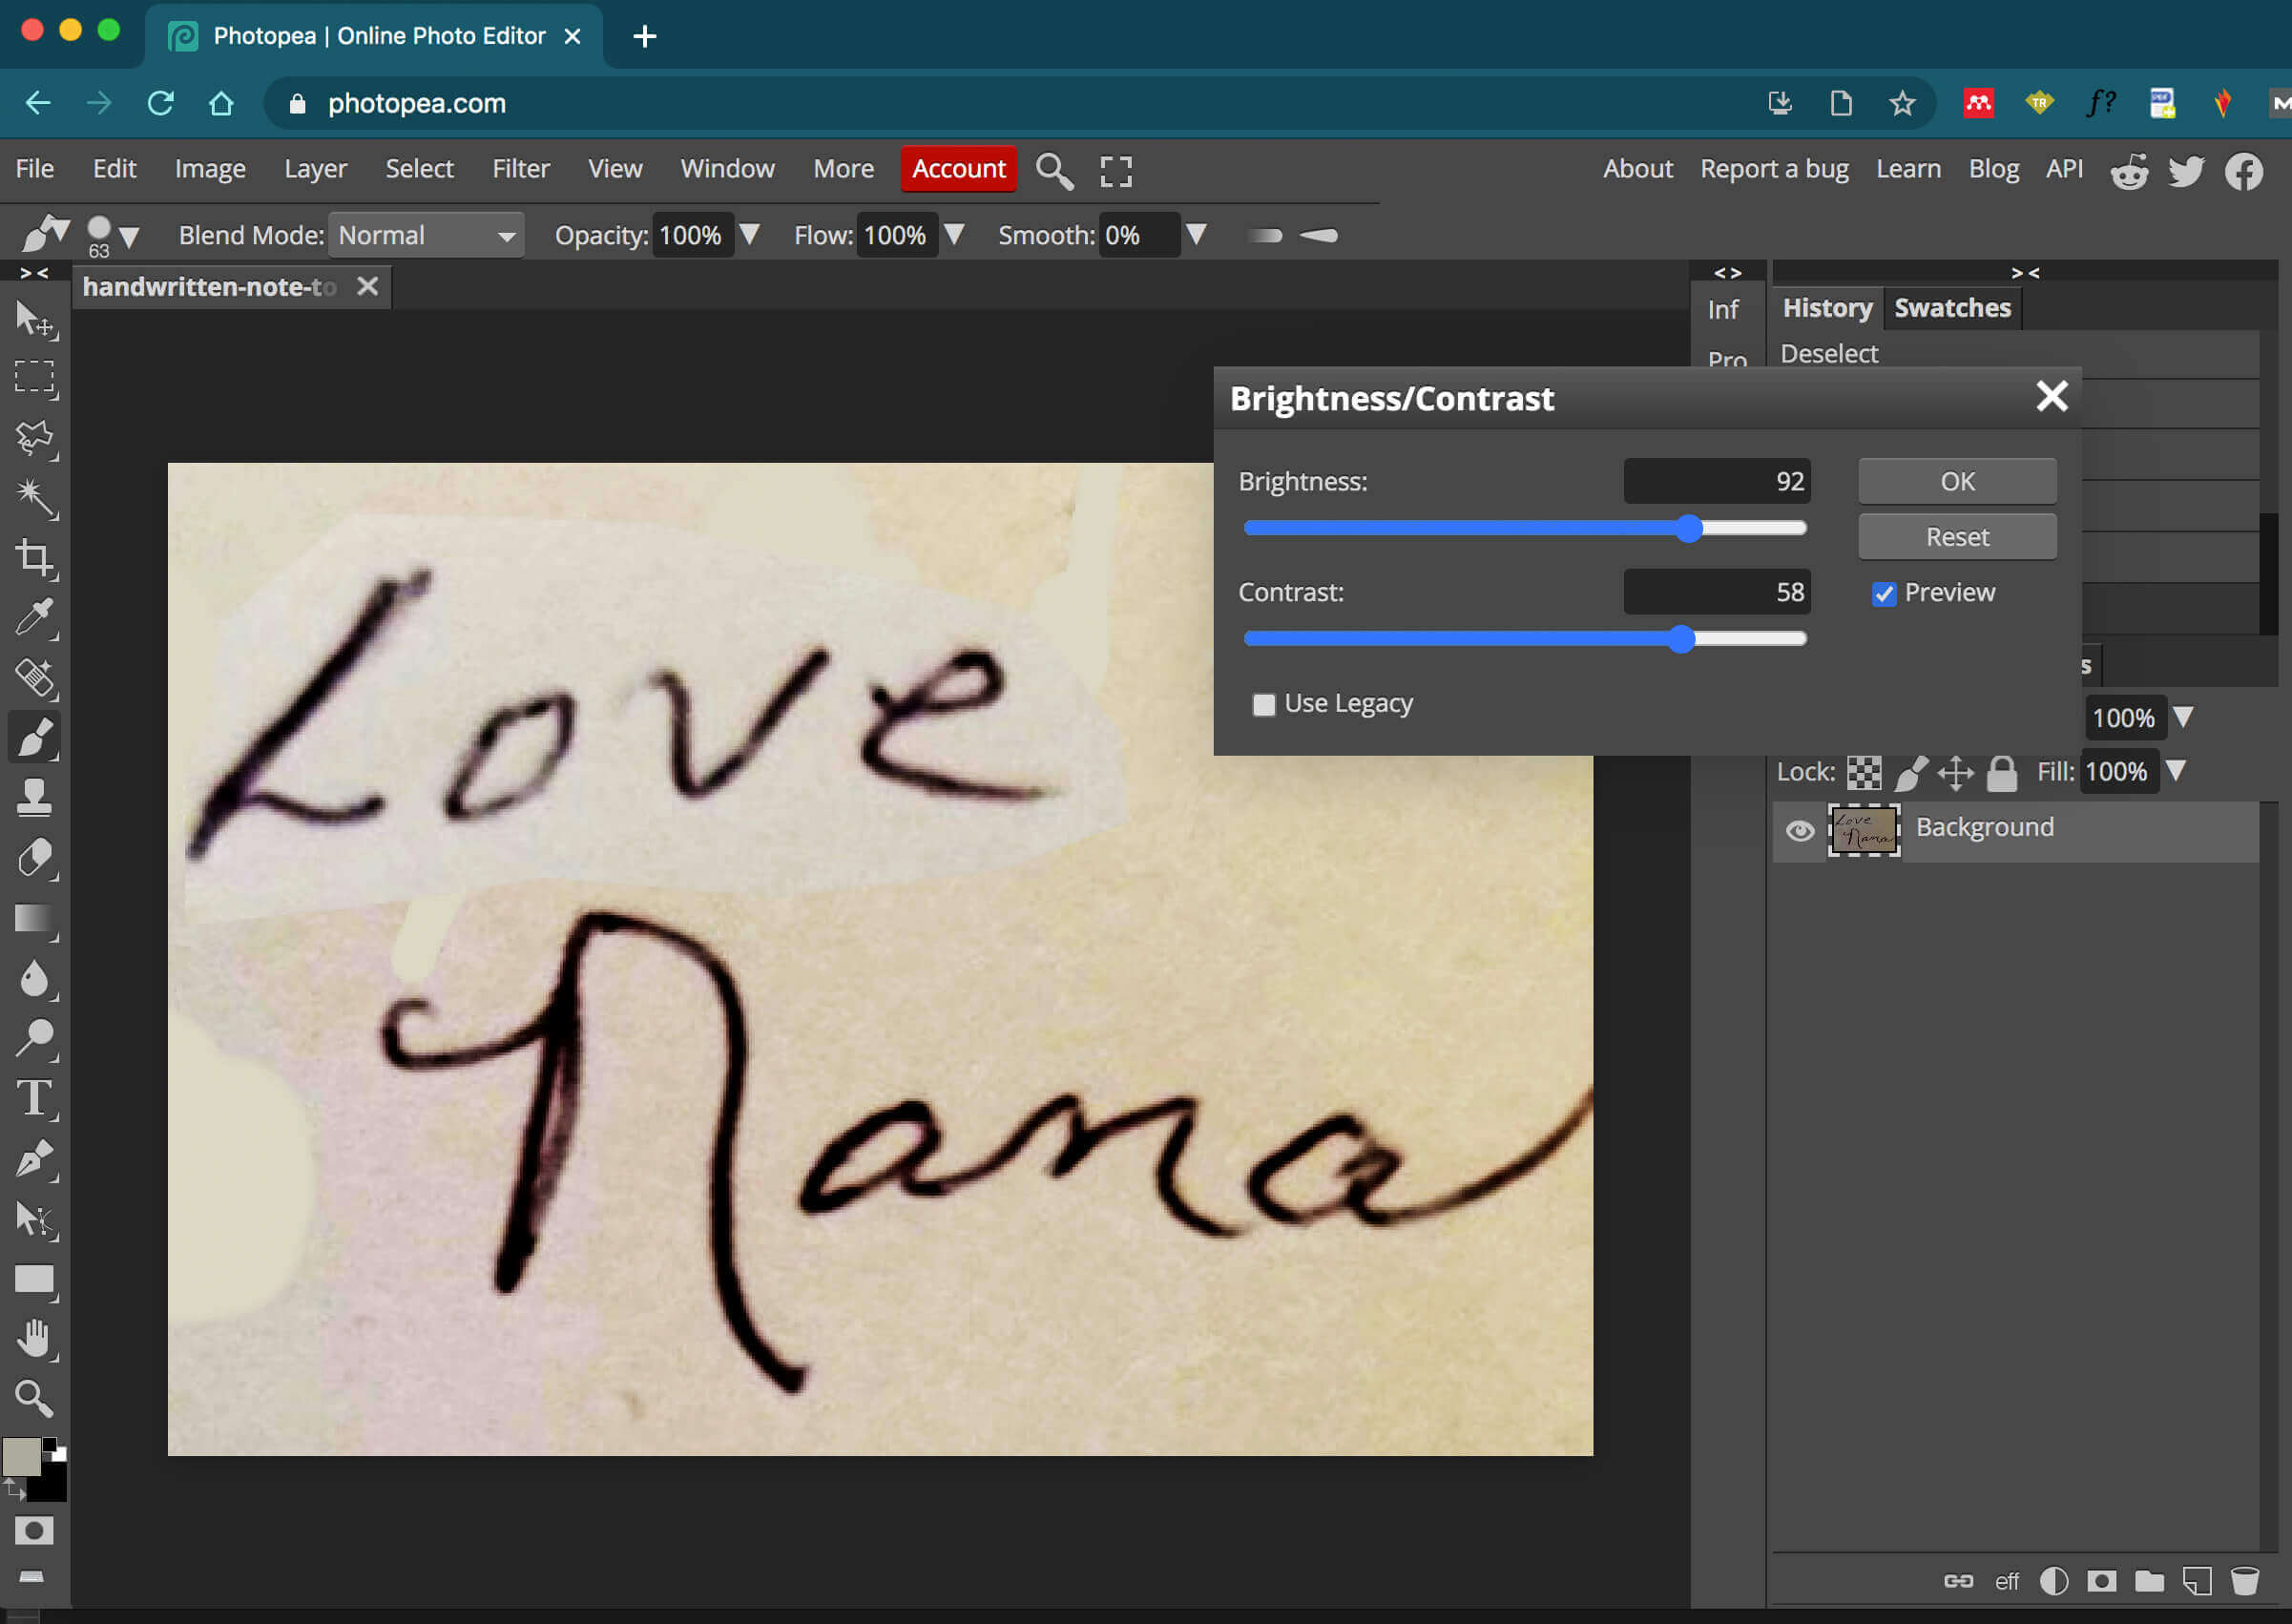
Admittedly, this image isn’t too pretty, but it will be good enough to work with in SewArt.
Exporting the image for SewArt
To save the image as a JPEG, just go to File -> Export As -> JPG. Make sure that the JPG is select as your format. Then adjust the width and height to be whatever size you want your embroidery file to be. Then hit “Save.”

Importing the image into SewArt
To open your image in SewArt, you just go to File -> Open and then locate your image. Make sure you select the image that you just edited and not your original.
Reducing the number of colors in the image
If you are familiar with SewArt, you will know that one of the first steps you need to take before converting an image to an embroidery file is to reduce the number of colors. I don’t need this to be perfect, so I will simply select the Reduce Colors button and select 2 so that my image will be comprised of only two colors. If you have done a good job of increasing the contrast of your image, SewArt can easily tell what parts of your image are writing and what parts are background.

Touching up the letters
You may need to fill in some of the areas of the letters that disappeared in the conversion. In my case, I needed to fill in a bit of the “e” in “Love”. I selected the pencil tool, used the eyedropper to sample the color of the letters and drew in the parts of the “e” that were missing.
Changing your background color
The next step you need to take is to change your background color to pure white. Select your paint bucket tool, then your pure white color swatch and then click on your image – anywhere in the background. You will see that the background turns to white. You will also need to click inside any closed shapes within letters to change the background to white.
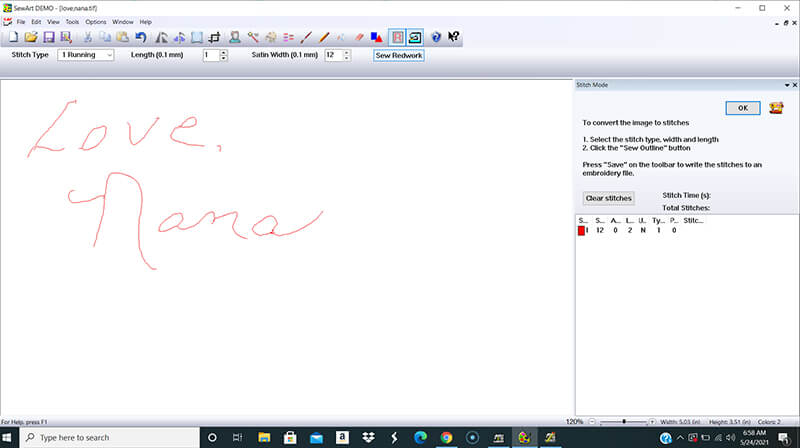
Convert to redwork
Now you are ready to convert your art to redwork – which is essentially regular stitching along the lines defined by the handwriting. Click the R button and choose the “Center line” option. Your art will change to a red line that goes through the center of your letters.

Defining the stitches
Now, click on the sewing machine icon. This will take you into the stitch definition mode of the software where you can specify what type of stitching you would like to apply to your paths. A running stitch is the most basic, but you can also apply a satin stitch or even a blanket stitch to the paths you define.
For any stitch type you select, you can also change the stitch length and the width (if you are doing a satin or blanket stitch). Keep in mind that the longer the stitch length, the less accurately you will be able to replicate the curves of the letter forms.
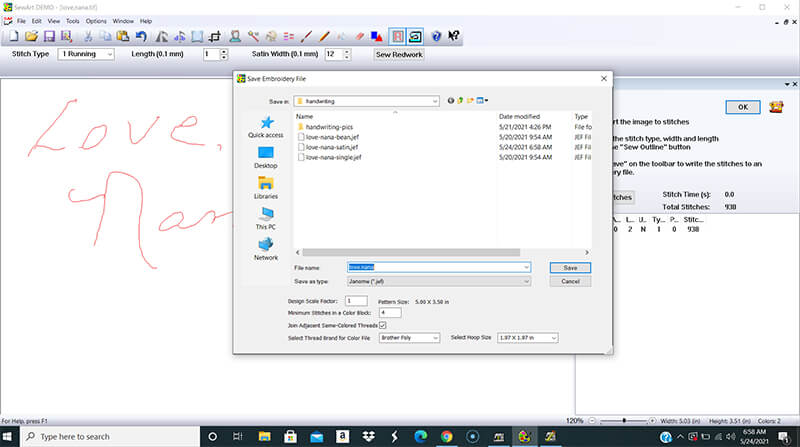
Saving the embroidery file
After you have defined your stitch types, you can save your embroidery file. Just click on the floppy disc icon or choose “File -> Save,” and choose your appropriate stitch type.
Ready to stitch!
Now all you have to do is transfer your embroidery design over to your embroidery machine and you are ready to stitch it out. But, before you stitch out your handwriting on anything – make sure you test it out. You may want to change the stitch settings if you are not happy with the results. Experiment and have fun!
Happy stitching!
xo
Julie
Want to remember this? Save “How to digitize handwriting for machine embroidery” on your favorite Pinterest board
The post How to digitize handwriting for machine embroidery appeared first on Machine Embroidery Geek.
* This article was originally published here: https://www.machineembroiderygeek.com/how-to-digitize-handwriting-for-machine-embroidery/
NYC Digital Printing Services
Queens Digital Printing Services
| • Vinyl Signs Queens | • Vehicle Graphics Queens |
| • Wall Decal Queens | • Car Wrap Queens |
| • Window Signs Queens | • Truck Decals Queens |
| • Vinyl Decals Queens | • Boat Wrap Queens |
Brooklyn Digital Printing Services
| • Vinyl Graphics Brooklyn | • Wrap Advertising Brooklyn |
| • Wall Wrap Brooklyn | • Vehicle Wrap Brooklyn |
| • Window Graphics Brooklyn | • Truck Graphics Brooklyn |
| • Custom Decal Brooklyn | • Boat Decal Brooklyn |