Syndicated by One Source Media, Long Island City, New York
Just If you have been looking into different embroidery digitizing software, you may have experienced a big of sticker shock. Some of the higher-end, professional level embroidery digitizing programs are EXPENSIVE. While some are less expensive and suitable for beginners (such as SewArt), and many of them offer free trials, I’ve never encountered any tool that creates embroidery files for free. That is, until I discovered Inkstitch.
What is Inkstitch?
Inkstitch is a plugin for a Inkscape, a free vector-based illustration program.
What is Inkscape?
Inkscape is most comparable to the professional level illustration program, Adobe Illustrator. It’s pretty powerful and versatile, especially in light of the fact that it’s 100% free, open-source and runs natively on MACs, PCs and even Linux machines.
So why would you care about vector-based graphics?
Vector-based graphics are different from images found on the web like JPGs, GIFs and PNG files. Web graphics are pixel-based (or bitmap or raster) graphics. Pixel-based graphics are comprised of pixels. If you zoom in on one, you will eventually see individual pixels that, in combination, create an image. Vector-based graphics are different because they are stored as a series of commands so they can be recreated at any size and will never look pixelated.
The advantages of converting vector based graphics into embroidery designs
Because vector-based graphics have precisely defined shapes (and are not just comprised of different colored pixels), they are A LOT easier to convert to embroidery designs than their pixel-based counterparts. For more details on exactly how vector-based graphics behave differently from pixel-based graphics, please see my previous post on how I converted a vector-based logo into an embroidery design using SewArt.
Because vector-based graphics provide such a clean basis for an embroidery design, it makes sense that someone would invent a software that combines a vector-based drawing program with embroidery file format exporting capabilities.
How does Inkstitch work?
Installing Inkstitch
Before you can start using Inkstitch, you need to install Inkscape. Remember – Inkstitch is just the plug-in for Inkscape, so you need to get that first. Fortunately, Inkscape is easy to install – no different then installing any other program.
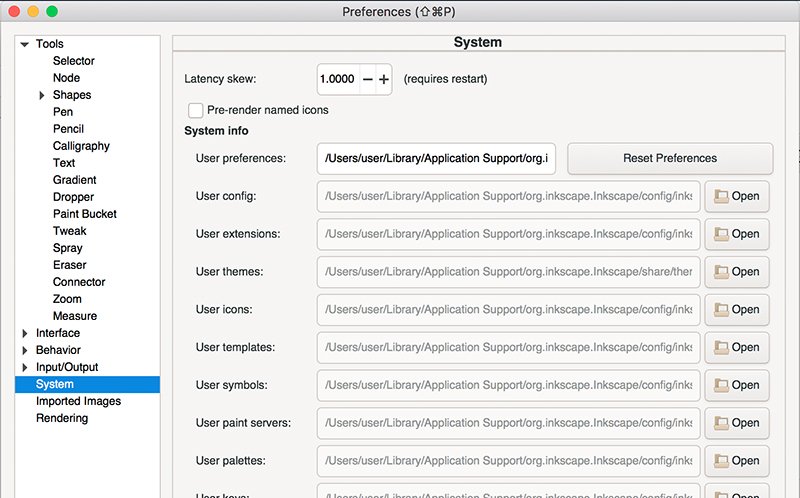
After you install Inkscape, you need to download all the files associated with Inkstitch. You will download them as a ZIP file and then uncompress that ZIP. After that, you need to figure out where to place all these files. To do that, you first need to look under the Inkscape preferences and then click on the “System” link on the left. You will then see preset directories where Inkscape looks for associated program files. Just click the “Open” button after the User extensions text field to see where you copy over all of the Inkstitch files; the “Open” button will open this directory for you. So, at this point – all you have to do is copy over the uncompressed Inkstitch files you downloaded and drop them into the folder that you just opened.
Creating a vector graphic in Inkscape
Because Inkstitch is a plugin for Inkscape (a vector-based drawing program), you must first create your art as a vector-based graphic. This might be a bit daunting if you know nothing about creating vector-based graphics. But, you can learn quickly if you play around with some of the drawing tools in the program. For example, if you drag and drop the rectangle tool, you can easily create a rectangular shape. Then you can create more complex shapes by performing Boolean operations between these two shapes.

Before you can convert your vector graphic to an embroidery file, you must first convert it to a path. Select the graphic and then go to the Path menu and select “Object to Path.”
Converting the vector graphic to an embroidery file.
Once you have created your desired vector shape saved as a Path, then you can convert it into an embroidery design. All of the functionality you will need to create this embroidery file are located under the Extensions menu and then “Inkstitch.”
With the vector-based object selected, choose the Params option under Extensions then Inkstitch. The menus that appear allow you to specify what type of stitching you would like to use to represent your object. In the example below, you can see that I chose a fill stitch with a 45 degree stitch angle with 1.5 mm long stitches. I also added an underlay to ensure adequate coverage of the stitching on the fabric once you stitch it out.
If you enter settings that you think you might want to use again, you can save them as a preset. This will make it easier to quickly apply these settings to another object.
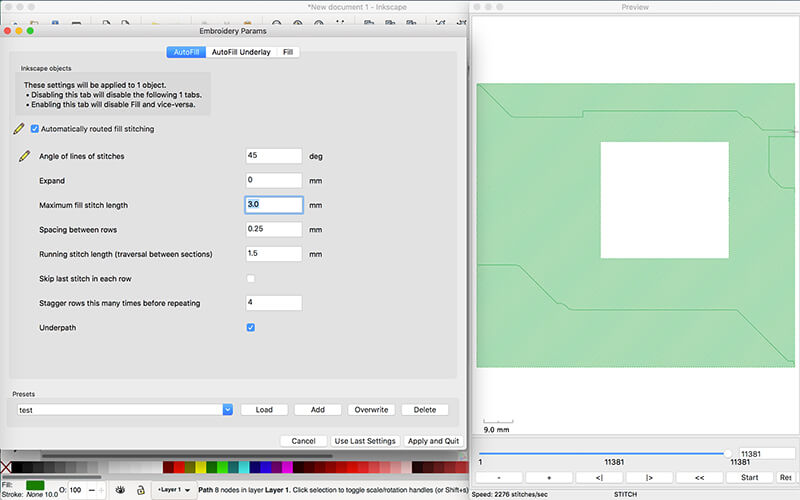
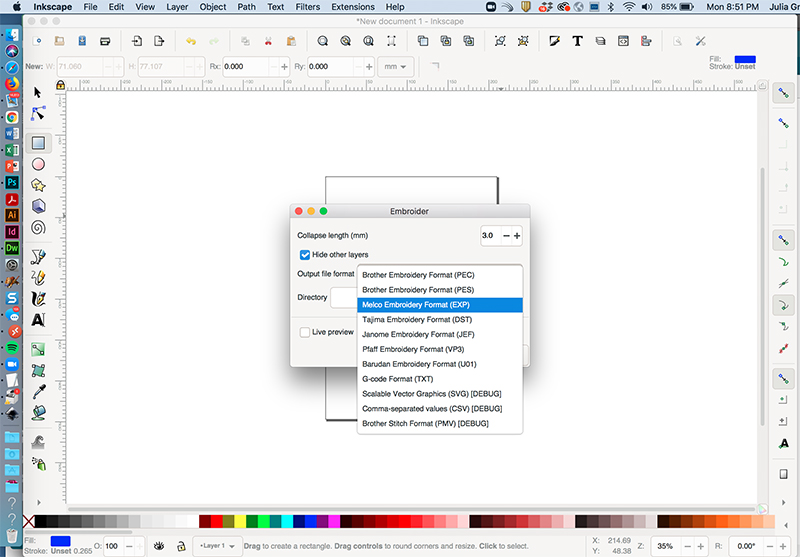
After you apply your desired settings to the object, then you can export your embroidery design. You do this by selecting the Embroider option from the Inkstitch menu underneath the Extensions menu. In this dialog box you can select your desired embroidery file format.
Load embroidery file format onto your embroidery machine
After you generate your embroidery file, you can load it onto an embroidery machine and stitch it out. Never transferred an embroidery file onto an embroidery machine? Learn how.
Additional capabilities of Inkscape and Inkstitch
With Inkstitch, you can certainly convert more than one vector shape into different embroidery areas. You can also generate different types of embroidery files other than fill stitch areas.
Appliqué files
Instead of generating simple fill areas, you can also create appliqué designs. As long as you can get the object into a vector based format, you can specify whether you want the shape to be stitched as a fill or as an outline. And, a series of outline files is all you need to create an appliqué design.
Lettering
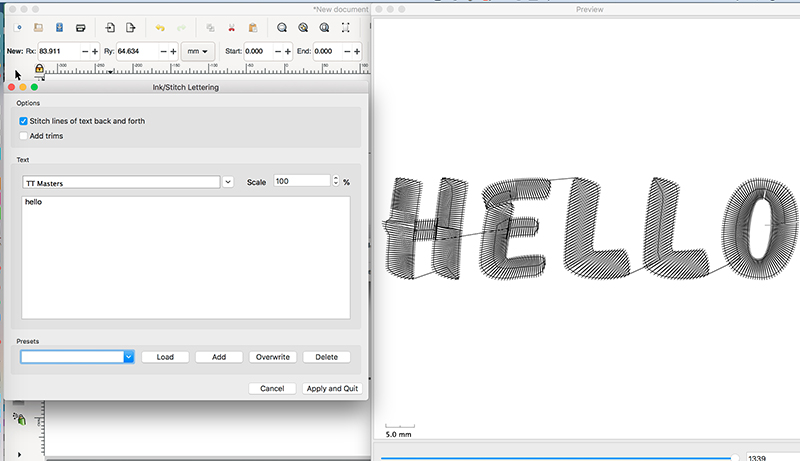
Inkstitch has the ability to create embroidery files from letters. While the font choices in Inkstitch are quite limited, you can still generate words and phrases very quickly and then save them as embroidery files.
Other file formats
If creating vector-based objects is not your jam, you can always import pre-existing vector-based graphics into Inkscape and build your design from there. Inkscape will read common vector-based file formats such as EPS, PDF, SVG and even AI files. You can even import pixel-based graphics and covert them to vector files in Inscape.
Ready to give it a try?
There is certainly a lot to explore in Inkstitch, but you can only learn by downloading the program and giving it a try. Check out the Inkscape website were you can download the Inkscape program.
Then, visit the Inkstitch site to download the embroidery extensions.
Want to remember this? Save “What is Inkstitch” on your favorite Pinterest board
The post Inkstitch: a free embroidery digitizing program appeared first on Machine Embroidery Geek.
* This article was originally published here
Find One Source Media on Google Maps: https://www.google.com/maps?cid=5313632701819553670
